
The Professional Guide to Non-Damaging Shell Scheme Wall Panels for 2026
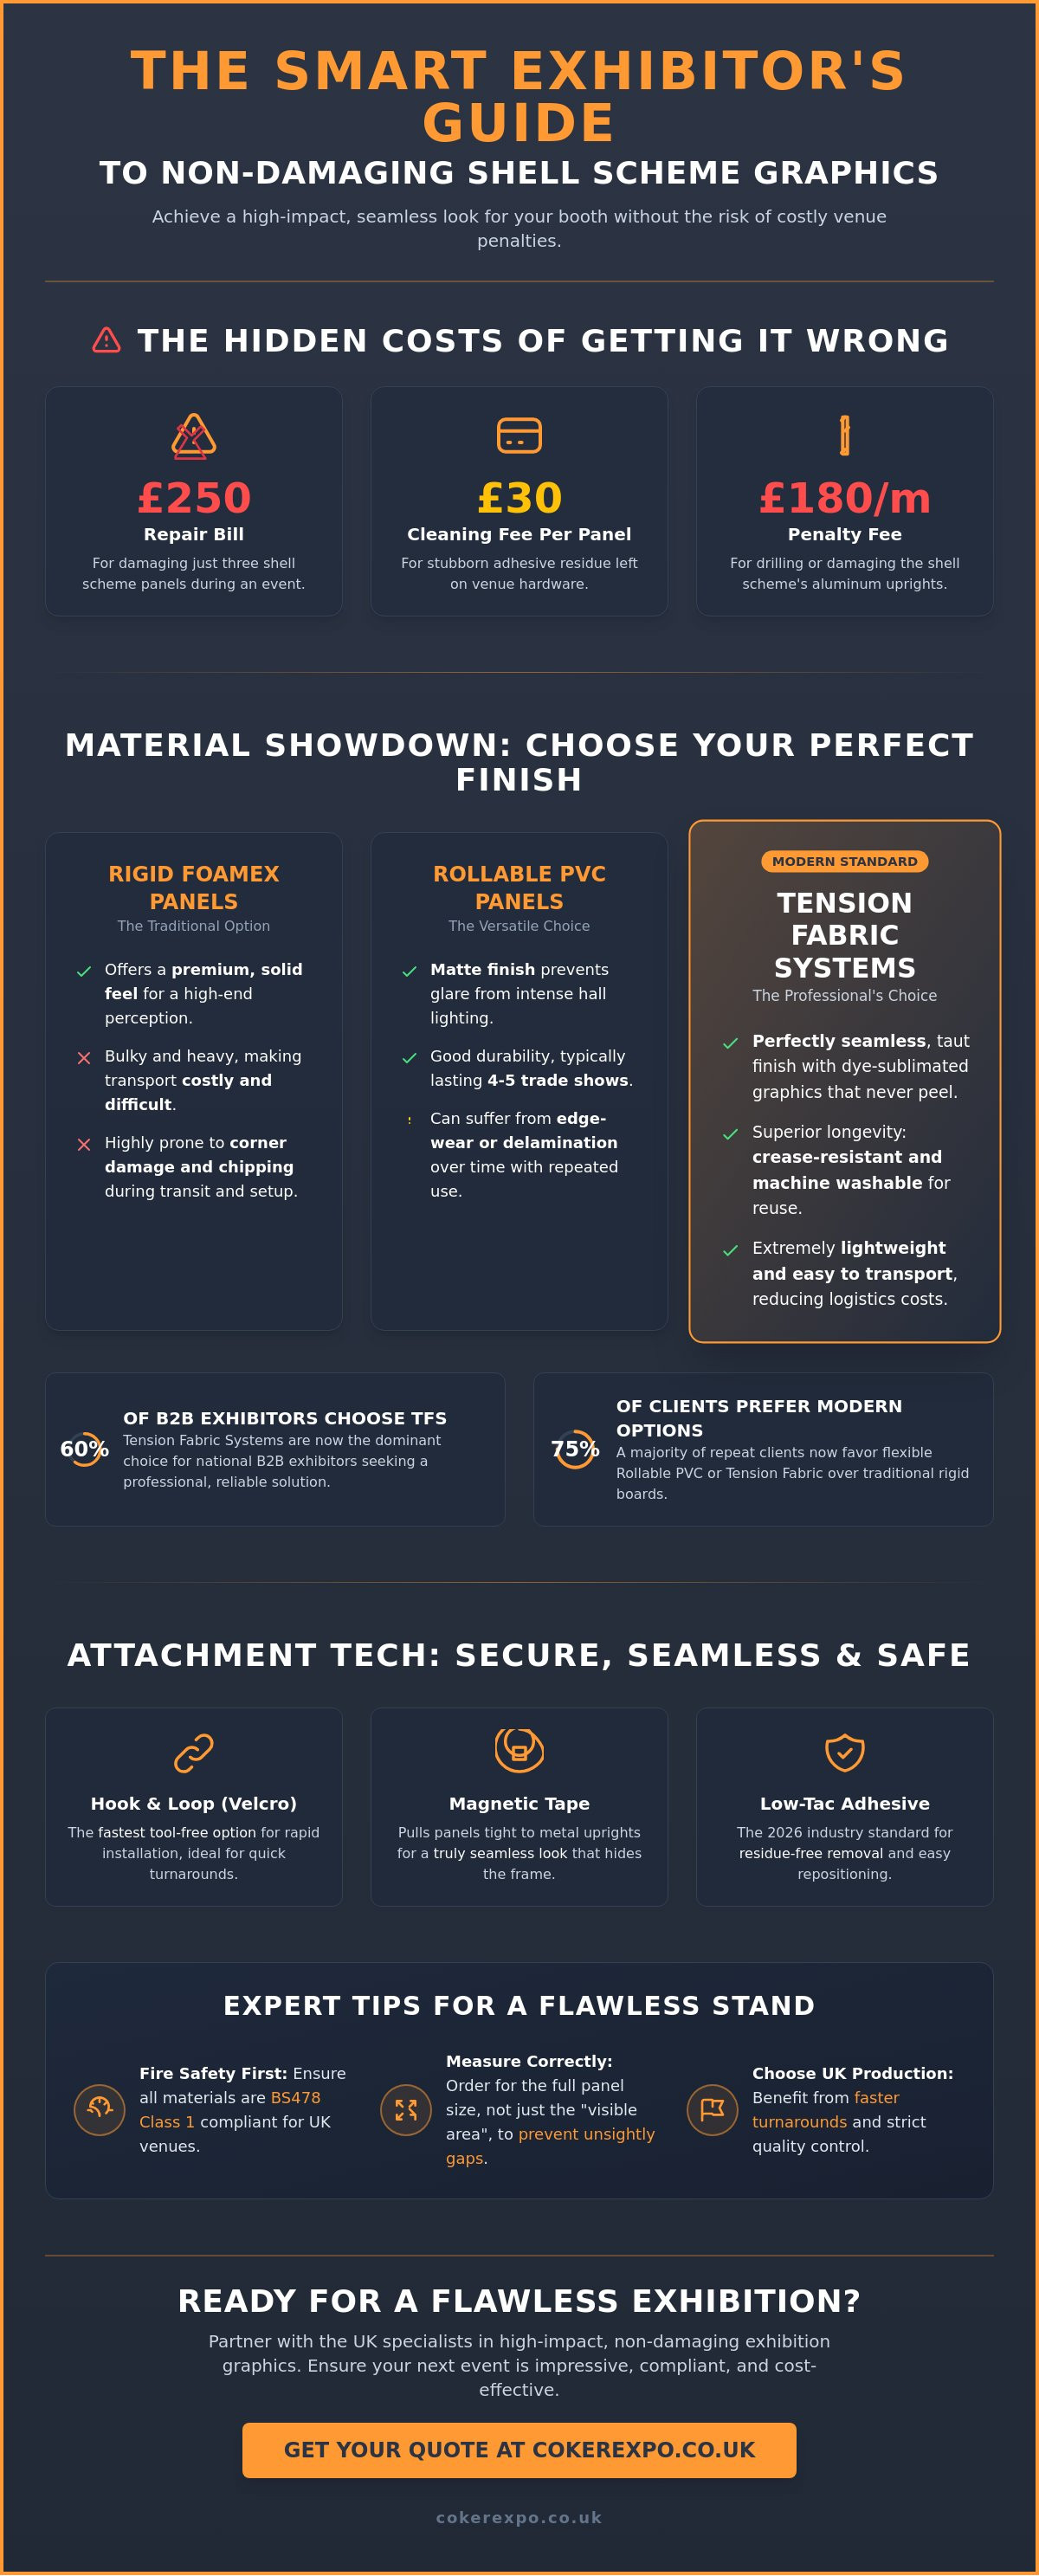
Industry data for 2026 shows that damaging just three shell scheme panels can result in a £250 repair bill, while cleaning fees for stubborn adhesive residue now average £30 per panel. It's a significant financial risk that many marketing managers face when trying to make a professional impression at venues like the NEC or ExCeL. You shouldn't have to compromise your brand's aesthetic just to avoid these costly penalties or the stress of complex, tool-free assembly.
This guide shows you how to transform your booth using non-damaging shell scheme wall panels that provide a high-end, seamless look with zero risk to the venue's hardware. We'll help you achieve a fast installation that stays secure throughout the event, avoiding the low-quality graphics that often peel or curl mid-show. We cover everything from the latest Tension Fabric Systems (TFS) used by over 60% of national B2B exhibitors to specific UK fire safety standards like BS478, ensuring your stand is both compliant and impressive for your next event.
Key Takeaways
- Learn how modern low-tac technology enables high-impact branding without leaving adhesive residue on hired venue hardware.
- Compare the durability and lifespan of PVC versus Tension Fabric Systems to select the most cost-effective material for your 2026 event calendar.
- Avoid the common "Visible Area" measurement trap to ensure your non-damaging shell scheme wall panels fit perfectly without unsightly gaps.
- Master a tool-free installation process that allows for a fast, professional setup without the need for specialized labor or equipment.
- Discover the advantages of UK-based production for achieving faster turnarounds and maintaining strict quality control on your exhibition infrastructure.
What are Non-Damaging Shell Scheme Wall Panels?
Non-damaging shell scheme wall panels are specialized graphic solutions designed to skin the standard modular aluminum frames provided by exhibition organizers. Unlike permanent installations, these panels use advanced attachment technologies to provide a high-impact visual surface without altering the underlying structure. This is a critical distinction for exhibitors because the shell scheme hardware is rented equipment. Any permanent modification, such as drilling holes or using high-bond adhesives, results in immediate financial penalties from the venue.
The industry has shifted away from permanent fixings toward modular, non-damaging systems to accommodate the high-pressure environment of UK trade shows. While some exhibitors still consider the traditional shell scheme option as a baseline, modern branding requires a more polished, seamless finish. Using non-damaging shell scheme wall panels allows a brand to achieve a custom-built look while ensuring the stand is returned in its original condition. This practical approach eliminates the "hidden costs" of exhibiting, such as the £180 per linear meter charge for damaging aluminum uprights.
The Evolution of Shell Scheme Graphics
The transition from heavy, 5mm Foamex boards to lightweight, rollable PVC and Tension Fabric Systems (TFS) has changed how marketing managers plan their stands. Modern digital printing, specifically dye-sublimation for fabrics, ensures that graphics don't peel or curl even under intense hall lighting. These materials are easier to transport and significantly faster to install without specialized labor. In 2026, the low-tac adhesive standard for exhibition venues is defined as a pressure-sensitive adhesive that provides a secure bond during the event while allowing for clean, residue-free removal within 72 hours of application.
Why "Non-Damaging" is a Requirement, Not an Option
Venue regulations in 2026 are stricter than ever regarding the condition of returned materials. Statistics show that damaging just three panels can lead to a £250 repair bill, making "non-damaging" a financial necessity. Beyond the cost, compliance with fire safety standards is mandatory. All non-damaging shell scheme wall panels must conform to BS478 Class 1 Fire Regulations to be permitted inside major UK halls. Choosing the right system means balancing strong adhesion that lasts the duration of the show with a tool-free removal process that leaves the panels pristine. This reliability is why over 60% of national B2B exhibitors have now transitioned to Tension Fabric Systems for their primary branding needs.
Comparing Materials and Attachment Methods
Choosing the right substrate for your non-damaging shell scheme wall panels is a balance between visual impact and logistical ease. While rollable PVC panels remain a popular entry-point for many, the 2026 market has seen a sharp move toward matte finishes to combat the high-intensity LED lighting now standard in major UK halls. Glossy finishes often cause bounce-back glare that obscures branding in photographs, whereas matte PVC and tension fabrics provide a clean, professional surface that looks excellent from every angle.
Lifespan is a critical metric for marketing managers looking to maximize their budget. High-quality rollable PVC panels typically survive four to five trade show seasons before edge-wear or "delamination" becomes visible. In contrast, Tension Fabric Systems (TFS) offer superior longevity because the graphics are machine washable and resistant to the permanent creasing that can ruin rigid boards or PVC during transit. While rigid Foamex panels offer a premium feel, their bulk makes them prone to corner damage, which is why 75% of our repeat clients now favor rollable or fabric alternatives.
Attachment Technologies: Velcro vs. Magnetics vs. Low-Tac
Most competitors only mention one or two methods, but the specific shell scheme system (such as Octanorm or Sodem) dictates the best fix. Hook-and-loop (Velcro) is the fastest tool-free option, but it can leave a slight gap between the panel and the frame if not applied with precision. Magnetic tape systems are the preferred choice for a "seamless" look because they pull the panel tight against the metal uprights, hiding the poles entirely. For a truly residue-free experience, micro-suction and low-tac adhesive backings are the current industry standard, allowing for multiple repositioning attempts during install without losing grip. Safety is paramount during this process; following OSHA safety standards for handling large-format displays prevents workplace injuries during the high-pressure build phase of an event.
Choosing the Right Material for Your Brand
Tension fabric has become the B2B gold standard because it's incredibly lightweight and fits into a single carry bag, reducing drayage costs. For solo exhibitors, rollable PVC offers a balance of durability and ease, provided you select a material with a "stop-light" blockout layer to prevent shadows from the shell scheme frame. To ensure your graphics remain impactful, look for panels with edge-curl resistance, which prevents the "peeling" look common with cheaper, economy-grade materials. If you're unsure which material fits your 2026 schedule, exploring a range of Shell Scheme Graphic Panels can help you match the right hardware to your specific venue requirements.
Measuring and Compatibility: The Specialist Approach
Precision is the primary difference between a high-end booth and a DIY disaster. When ordering non-damaging shell scheme wall panels, many marketing managers fall into the "Visible Area" trap. They provide the total panel dimensions without accounting for the aluminum uprights that hold the structure together. This results in graphics that are either too large to fit the frame or too small, leaving unsightly white gaps that ruin the professional aesthetic you've invested in.
You must request a technical specification sheet from your event organizer at least six weeks before the show. Most UK venues use Octanorm, but systems like Sodem or Modul also appear at major trade shows. Each has unique groove depths and pole widths. If you don't know the exact system, your tool-free installation will quickly become a nightmare of manual trimming on-site. We've seen exhibitors lose hours of setup time because their panels were cut to a generic 1000mm width that didn't account for the internal visible space of the frame.
Identifying Your Shell Scheme Type
Look closely at the upright poles during your next site visit or in the exhibitor manual. If they are octagonal with eight vertical grooves, you're dealing with an Octanorm system. Square or circular poles indicate a different modular build. Never assume a "standard" size will fit, as internal dimensions can fluctuate by up to 50mm depending on the contractor. For a deeper dive into these variations, consult The Ultimate Guide to Shell Scheme Graphic Panels for UK Exhibitors to ensure your hardware choice is compatible with the venue's infrastructure.
Technical Drafting for Graphic Designers
Your designer needs to treat each panel as an individual unit while maintaining a continuous visual flow across the stand. Keep critical text and logos in a "safe zone" at least 50mm away from the edges to avoid them being obscured by the aluminum uprights. The standard visible panel size for an Octanorm system is typically 950mm wide by 2340mm high, though this can vary depending on the specific extrusion used by the contractor. When designing across multiple non-damaging shell scheme wall panels, ensure the join doesn't slice through a person's face or a small font tagline. Accounting for the 40mm or 50mm width of the poles between panels is the only way to maintain brand integrity across a large-scale display.
Installation and Removal: Ensuring a Tool-Free Experience
The core of the CokerExpo promise is a tool-free assembly that respects your time and your budget. When you arrive at your stand, you shouldn't need a toolkit or a team of contractors to install your graphics. Our non-damaging shell scheme wall panels are engineered for a fast, intuitive setup that allows marketing managers to focus on lead generation rather than hardware troubleshooting. Efficiency is paramount when the hall is crowded and the countdown to the show opening is ticking. This modular approach ensures that your branding is the first thing ready, not the last.
The "Top-Down" method is the most reliable way to achieve perfect vertical alignment every time. Start by peeling back the first 100mm of the liner and aligning the top edge of the graphic with the top horizontal rail of the shell scheme. Gravity acts as your guide. As you gradually remove the backing, use a soft squeegee or a clean cloth to smooth the panel from the center outward. This technique eliminates air bubbles before they can form. If you notice a misalignment, the low-tac technology allows you to gently reposition the material without losing its adhesive properties or damaging the venue's infill panels.
Pre-Event Preparation Checklist
Surface preparation is often overlooked but determines the success of your install. Wipe down the aluminum frames with a 70% isopropyl alcohol solution to remove dust and grease; avoid household cleaners that leave a silicone residue. Temperature also plays a role. If the exhibition hall is below 10°C during build-up, the adhesive's initial "grab" will be lower. Keep your panels in a warm vehicle or office until the moment of installation to ensure optimal performance. For more strategic advice on planning your booth, see our guide on Exhibition Stand Design: The Professional Guide to Impact and ROI in 2026.
The Removal and Storage Protocol
Post-event efficiency is just as critical as the build. When removing your non-damaging shell scheme wall panels, always peel from a top corner at a 45-degree angle. Pulling too fast or at a sharp 180-degree angle can stretch certain PVC materials, making them difficult to align at your next event. Once removed, roll the panels with the graphic side facing out to prevent "tunnelling" or creasing. Use the original transit tubes for long-term protection, as these are designed to withstand the rigors of courier transport. Always inspect each panel for edge wear before storage so you can order replacements well ahead of your next show cycle. Ready to streamline your next show? Explore our range of high-performance display solutions today.
Why CokerExpo is the UK Specialist for Shell Scheme Panels
CokerExpo operates as more than a graphic print house; we're a technical partner for your exhibition strategy. We understand that marketing managers don't just need a sticker; they need a reliable infrastructure that protects them from venue fines while delivering a premium brand image. Our non-damaging shell scheme wall panels are the result of decades of hands-on experience in UK halls like the NEC and Olympia. We provide practical, specialist advice that moves beyond aesthetics to address the logistical realities of the trade show floor.
Our modular approach allows for seamless integration with other high-performance hardware. You aren't limited to flat wall graphics. Our panels are designed to work alongside TFS tension fabric systems, promotional counters, and even hire truss systems. This versatility means you can scale your presence from a simple 3x3 booth to a complex, multi-functional stand without reinvesting in entirely new graphic sets. We focus on the end result: a robust, impactful display that's as easy to dismantle as it is to build.
Made in the UK: Quality You Can Trust
We've been supporting UK exhibitors since 1999, maintaining a commitment to local craftsmanship that ensures absolute quality control. Manufacturing in-house allows us to offer a fast turnaround that's essential in the deadline-driven exhibition industry. When you work with a UK-based specialist, you eliminate the risks associated with international shipping and varying production standards. Every panel we produce meets the necessary BS478 Class 1 Fire Regulations, ensuring you're never turned away by a venue safety officer. For those looking to add even more impact to their stand, our panels pair perfectly with illuminated displays; you can learn more in The Ultimate Guide to Exhibition Lightboxes: Illuminating Your Brand in 2026.
Ready to Transform Your Stand?
Planning for a successful 2026 event season starts with the right hardware. Whether you're navigating a standard Octanorm setup or a bespoke non-standard stand, our team provides the technical drafting and planning services required for a flawless execution. We can help you manage complex multi-show requirements, ensuring your graphics remain crisp and reusable across different venues and configurations. Don't leave your booth to chance or risk expensive damage charges with inferior adhesives. View our full range of shell scheme graphic panels today and discover how our tool-free, non-damaging shell scheme wall panels can elevate your next exhibition.
Future-Proof Your 2026 Exhibition Strategy
Investing in the right infrastructure is the difference between a stressful setup and a seamless brand launch. By prioritizing high-performance materials and verified technical specifications, you eliminate the risk of venue penalties and mid-event failures. We've shown how non-damaging shell scheme wall panels provide a professional, tool-free solution that maintains its impact across multiple show seasons. Whether you choose rollable PVC for portability or a Tension Fabric System for a seamless look, the focus remains on British reliability and ease of use.
CokerExpo has been manufacturing display hardware in the UK since 1999. Our commitment to quality ensures every system we provide comes with a tool-free assembly guarantee and access to expert event management support. We're here to provide the foundation for your trade show success, handling the technical details so you can focus on building relationships. Your brand deserves a display that reflects its value without the hidden costs of venue damage. It's time to take control of your stand aesthetics.
Explore our range of professional non-damaging shell scheme panels and prepare for your most impactful exhibition season yet.
Frequently Asked Questions
Do non-damaging panels really leave no residue on the shell scheme?
Yes, high-quality non-damaging shell scheme wall panels use pressure-sensitive low-tac adhesives or mechanical clips that leave zero residue. These systems are specifically engineered to bond securely during the event and release cleanly within a 72-hour window post-show. This technology prevents the £30 per panel cleaning fees often charged by venue contractors for removing stubborn tape marks or glue.
Can I reuse these panels for different exhibitions?
You can absolutely reuse these panels across multiple trade show seasons. Rollable PVC panels typically maintain their integrity for five event cycles, while Tension Fabric Systems (TFS) offer even greater longevity as the graphics can be washed and folded. To maximize lifespan, always store your graphics in their original transit tubes and avoid folding PVC panels, which causes permanent creasing.
What is the difference between seamless and non-seamless shell scheme graphics?
Non-seamless graphics fit inside the individual shell scheme bays, leaving the aluminum uprights visible. Seamless graphics use specialized clips or magnetic tape to sit in front of the poles, creating a continuous "wall-covering" effect. Seamless options are preferred by 80% of our B2B clients who want to achieve a custom-built look without the high cost of a bespoke timber stand.
How long does it take to install a standard 3x3m shell scheme wall?
A standard 3x3m shell scheme wall typically takes one person between 30 and 45 minutes to install. Using the "Top-Down" method ensures vertical alignment is achieved quickly without the need for repositioning. This fast turnaround is a hallmark of our tool-free systems, allowing you to complete your booth setup well before the show opening deadline.
Will the panels fall off if the exhibition hall gets too hot or cold?
Panels won't fall off if the shell scheme surface is properly prepared. We recommend cleaning the aluminum frames with a 70% isopropyl alcohol solution to remove dust and grease before application. While extreme cold below 10°C can slow the initial bond, keeping the panels at room temperature prior to installation ensures they remain secure throughout the event duration.
Do I need any tools or ladders to install these panels?
No tools are required for the installation of our non-damaging shell scheme wall panels. Every component is designed for hand-assembly to ensure a stress-free user experience. While you don't need a toolkit, a small two-step ladder is often helpful for reaching the top horizontal rail of a standard 2.4m high shell scheme safely and accurately.
What happens if my shell scheme is a non-standard size?
We provide bespoke cutting services for any non-standard shell scheme dimensions. While Octanorm is the UK standard, some venues use unique systems with varying internal visible areas. By providing us with your technical manual's specifications, we can manufacture panels to your exact requirements, ensuring a perfect fit regardless of the modular system being used at your specific event.
Are these wall panels fire-rated for UK exhibition venues?
All our shell scheme graphics are fully fire-rated to meet strict UK venue regulations. Materials conform to BS478 Class 1 Fire Regulations, which is a mandatory requirement for major halls like the NEC and ExCeL. We can provide the necessary certification for your health and safety file, ensuring your stand remains compliant with all local authority and venue standards.
Einen Kommentar hinterlassen