
Troubleshooting LED Lightbox Hotspots: A Professional Guide to Flawless Illumination
Your high-stakes brand display is only as good as its weakest diode. When visible striping or spotting appears across your logo, the premium feel of your entire event stand evaporates instantly. Troubleshooting led lightbox hotspots often feels like a race against the clock, especially when you've spent weeks perfecting a creative that now looks amateur under poor lighting. It's a common frustration that creates unnecessary pressure when stakeholders are walking the floor and expecting a perfect finish.
This guide provides the technical clarity you need to move beyond guesswork and achieve a flawless, high-end result. We will break down the physics of the 1:1.5 depth-to-pitch ratio and examine how modern backlit fabrics impact light diffusion. You'll also learn the exact specifications required to ensure your next installation meets rigorous performance standards, including the Title 24-2025 lighting requirements and NFPA 701 fire safety compliance. Whether you're dealing with an immediate on-site issue or specifying hardware for a future project, these professional fixes ensure your brand remains the focal point for all the right reasons.
Key Takeaways
- Understand the mechanics of the "Starry Night" effect and how visible diodes can undermine the perceived value of your display.
- Apply the 1:1.5 depth-to-pitch calculation when troubleshooting led lightbox hotspots to achieve a professional, uniform glow.
- Implement immediate on-site fixes like the "diffuser layer" trick to salvage your presentation under high-pressure event conditions.
- Select high-performance fabrics engineered for optimal opacity and light diffusion to prevent striping on your graphics.
- Recognize the reliability advantages of UK-manufactured infrastructure and pre-tested LED arrays for consistent, high-impact results.
What Are LED Hotspots and Why Do They Ruin Displays?
In the world of high-impact visual marketing, an LED hotspot is a concentrated area of light that appears significantly brighter than the surrounding graphic. While a lightbox is designed to provide a uniform, vibrant glow, hotspots create a "Starry Night" effect where individual diodes become visible through the fabric. This visual inconsistency immediately draws the eye away from your brand message and toward the hardware flaws. Troubleshooting led lightbox hotspots is essential because these imperfections suggest a lack of quality control. To a decision-maker or high-value client, uneven lighting makes an expensive custom stand look like a budget, DIY assembly.
The nature of these artifacts depends on your system's architecture. Back-lit systems typically suffer from circular hotspots, whereas edge-lit systems often display "striping." These are vertical or horizontal lines of light that bleed from the frame's perimeter. Both issues stem from a failure to achieve a seamless blend of light before it hits the graphic face. When your illumination isn't perfectly diffused, it creates shadows and highlights that can distort your brand colors and make text harder to read from a distance.
The Anatomy of a High-Quality Lightbox
Achieving flawless illumination requires three components to work in perfect harmony. First, the LED module must have an appropriate beam angle. Wider angles allow light to overlap more effectively at shorter distances. Second, the system relies on an optical diffuser to scatter concentrated rays and eliminate harsh shadows. Finally, frame depth is critical. Light needs physical space to "bloom" or expand. Without sufficient distance between the diode and the fabric, even the most powerful LEDs will appear as distinct points of light rather than a soft, even wash.
Common Causes of Uneven Illumination
If you're currently troubleshooting led lightbox hotspots, the culprit is usually found in one of three technical areas:
- Insufficient Depth: Ultra-slimline frames often lack the internal volume required for light to scatter properly before reaching the graphic.
- Wide Pitch: When diodes are placed too far apart, the light from one module doesn't overlap with the next. This leaves "dead zones" or dark patches between the bright spots.
- Fabric Opacity: Low-grammage fabrics don't have the density to hide the internal hardware. High-quality backlit graphics require specific weaves and coatings to help redistribute light across the surface.
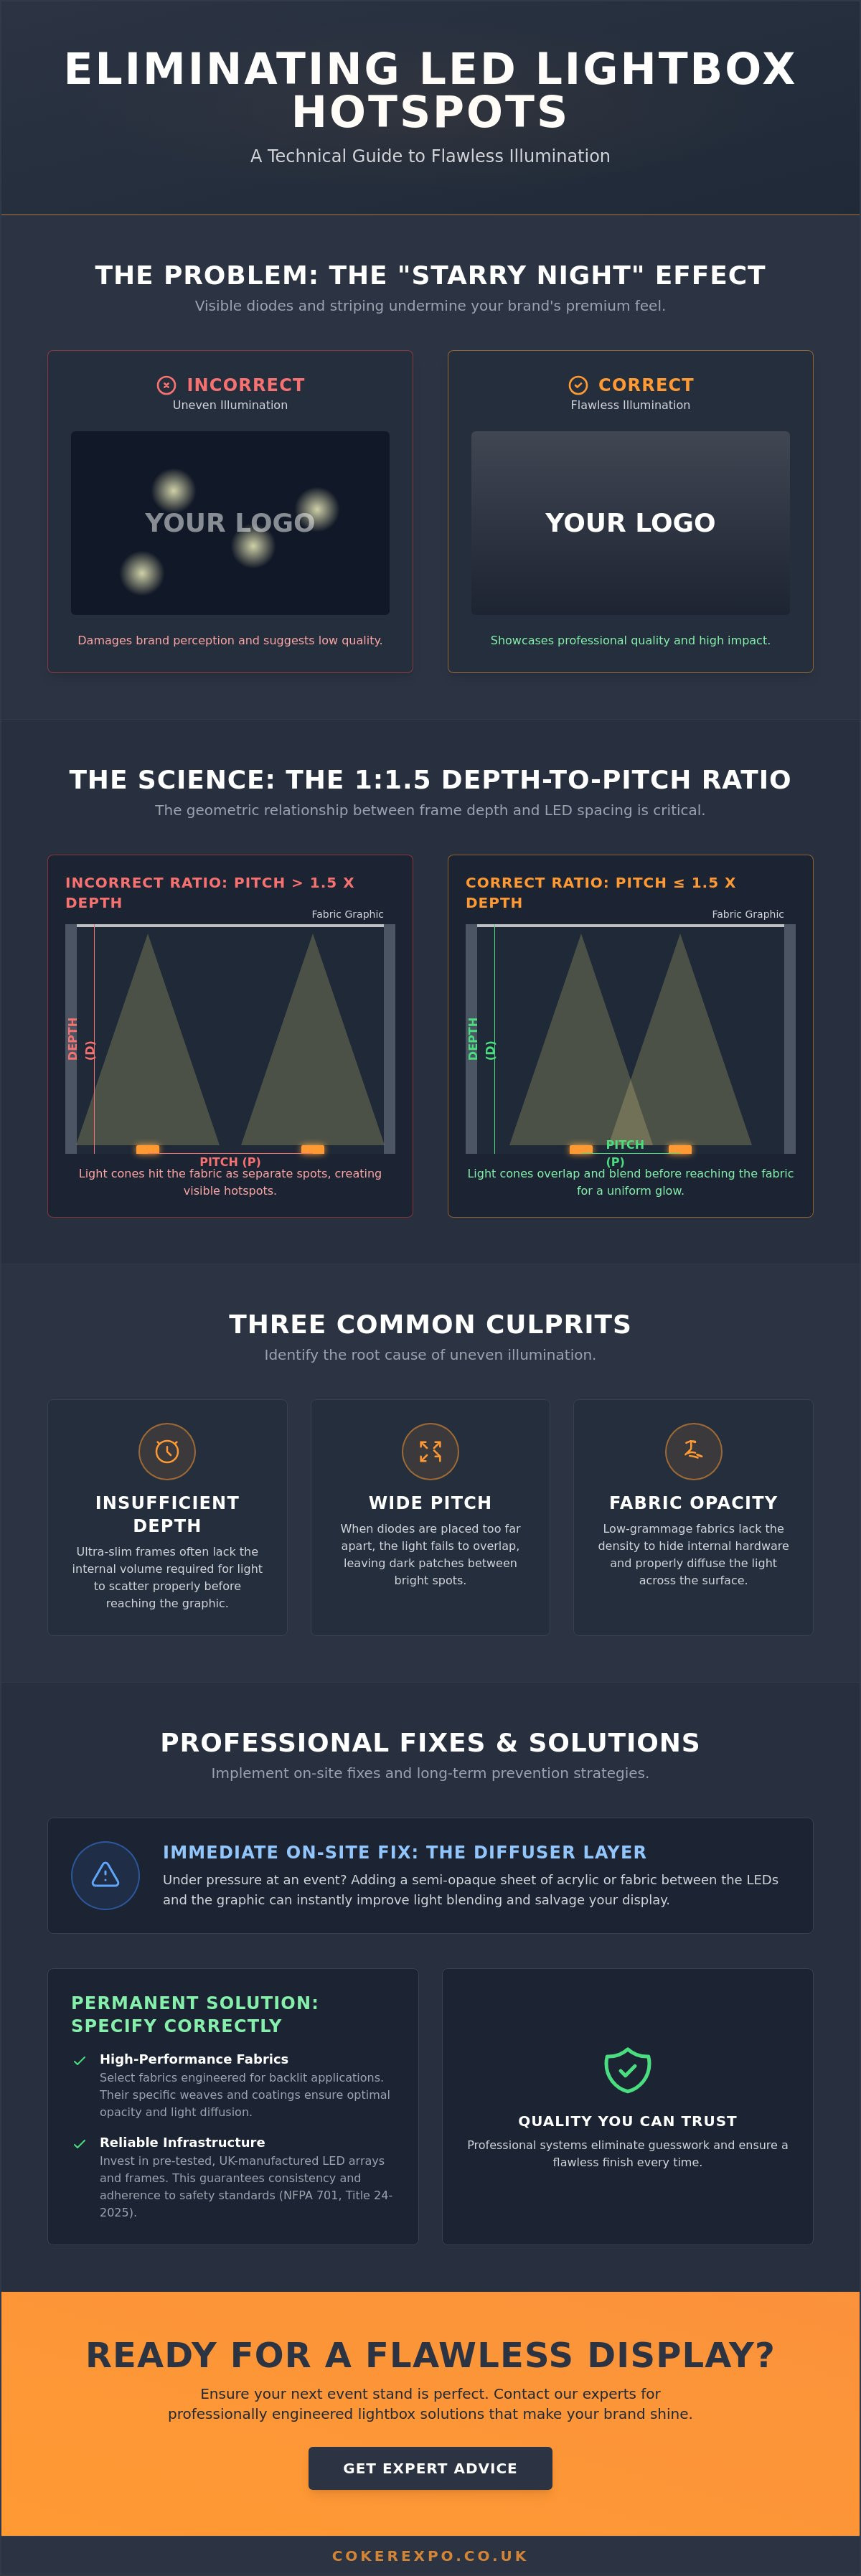
The Science of Spacing: The 1:1.5 Depth-to-Pitch Ratio
Flawless illumination isn't a result of chance; it's a product of precise geometric calculation. When troubleshooting led lightbox hotspots, the most common error isn't the light itself but the relationship between the light source and the display surface. The industry relies on the 1:1.5 depth-to-pitch ratio as a fundamental benchmark for back-lit systems. Pitch refers to the measurement between the center point of one LED module and the center of the next. To calculate your system's efficiency, measure this distance and compare it to the frame's internal depth. If the pitch exceeds the depth by more than 50 percent, you'll likely see visible spotting.
This ratio is critical because it facilitates the "bloom" effect. As light leaves a diode, it travels in a cone shape. To achieve a uniform surface, these light cones must overlap before they hit the graphic fabric. If the frame is too shallow or the LEDs are too far apart, the cones hit the fabric as isolated circles of intensity. Modern research on uniform LED illumination confirms that achieving a seamless luminance profile depends heavily on this diffusion distance. Deeper frames are more forgiving because they provide the physical volume required for light to scatter and blend naturally.
Calculating Your Lightbox Geometry
Your hardware's beam angle plays a decisive role in these calculations. A standard LED with a 120-degree beam angle requires more depth to bloom than a high-performance module with a 160-degree optic. Wide-angle lenses allow for shallower frames while maintaining the 1:1.5 ratio. If you're using ultra-slim frames, you must decrease the pitch significantly to prevent visual spotting. Edge-lit systems operate differently; they rely on perimeter lighting that reflects off a light-guided plate (LGP). If your display exceeds 2 meters in width, edge-lit systems often suffer from "shadowing" in the center because the light cannot reach the middle of the panel effectively.
Back-lit vs. Edge-lit Troubleshooting
Identifying the root cause of uneven light depends on the array type. In back-lit systems, hotspots usually indicate that the LED grid is too close to the fabric or the pitch is too wide. In edge-lit systems, "dead spots" in the center suggest the display is too large for the frame's light-carrying capacity. Check the perimeter tension and the quality of the LGP. If you're struggling with inconsistent results, investing in professionally engineered lightboxes ensures these ratios are pre-calculated for maximum impact. This eliminates the risk of striping and ensures your brand remains the focal point rather than the hardware behind it.
On-Site Fixes: How to Eliminate Hotspots During an Event
Discovering uneven lighting after your stand is fully assembled creates immediate logistical stress. At this stage, you cannot swap out hardware or re-engineer the frame depth. You need tactical, on-site solutions that preserve your brand's visual impact without requiring a total teardown. Troubleshooting led lightbox hotspots under event pressure requires a focus on light diffusion and environmental adjustment. These practical fixes allow you to salvage a compromised display and achieve a professional finish before the floor opens to stakeholders.
One often overlooked factor is the ambient lighting within the exhibition hall. High-intensity overhead hall lights can actually work in your favor by washing out some of the internal hotspots from the outside. However, if your stand is in a darker corner, the "Starry Night" effect becomes far more aggressive. If your power supply includes a dimming function, try reducing the intensity to 80%. This slight drop in peak brightness often masks the individual diodes without noticeably affecting the vibrancy of your graphics to the casual observer.
The Secondary Diffuser Solution
The most effective emergency fix is the "diffuser layer" trick. If the light cones aren't overlapping correctly, you must force them to scatter a second time before they hit your printed graphic. You can achieve this by securing a secondary internal barrier between the LEDs and the fabric face. Use a layer of unprinted backlit fabric or a thin, translucent white film. Secure this layer to the internal frame using tension clips or high-tack adhesive tape, ensuring it doesn't sag and create new shadows. While this might cause a 5% reduction in total brightness, the resulting uniformity is a far better outcome than visible spotting.
Optimising Your Graphic Tension
The physical position of your fabric graphic is just as important as the lights behind it. Silicone Edge Graphics (SEG) must be seated perfectly within the frame's channel to maintain a consistent air gap. If the fabric sags even slightly, it moves closer to the LEDs, which immediately intensifies any existing hotspots. Even a 2mm shift in fabric position can visibly reduce spotting by providing that tiny bit of extra space needed for the light to bloom correctly. Check the following points during your on-site inspection:
- Keder Seating: Ensure the silicone keder is pressed firmly into all four corners first, then work toward the center of each rail.
- Perimeter Tension: Look for "waves" in the fabric; these indicate uneven tension that creates varying distances between the light and the graphic.
- Internal Obstructions: Verify that no internal cables or support bars are pressing against the fabric and pushing it closer to the LED modules.
Graphic Materials: Why Your Choice of Fabric Matters
When troubleshooting led lightbox hotspots, the hardware is only half the equation. Your graphic material acts as the final stage of the optical system. If the fabric is too thin or lacks the correct coating, even the most precise LED array will fail to deliver a uniform glow. Professional exhibition lightboxes typically utilize high-opacity fabrics like "Samba" to ensure light is scattered effectively before it reaches the viewer's eye. These materials are engineered to balance light transmission with maximum diffusion.
The weight of the fabric, measured in grams per square meter (GSM), is a primary indicator of its performance. Standard backlit textiles usually range from 180gsm to 250gsm. A higher grammage provides more material density, which helps hide the individual diodes. Ink density also plays a tactical role in your display's success. Darker colors and heavy saturated prints naturally absorb more light, which masks inconsistencies in the LED array. Conversely, large areas of white space or light pastels are the most difficult to illuminate evenly because they reveal every minor variation in light intensity. If your brand uses a minimalist aesthetic, your choice of fabric becomes even more critical.
Tension Fabric System (TFS) Specifics
Tension fabric systems require precise execution to prevent light leakage. This often occurs at the corners where the silicone keder meets the frame. To maintain a professional finish, ensure the fabric is taut across the entire surface. For double-sided lightboxes, the use of a "block-out" liner on the reverse side is essential. This opaque layer prevents light from spilling out the back and washing out the colors on the primary face. When maintaining these graphics, avoid harsh chemicals or abrasive scrubbing. You can easily damage the specialized diffusing coating, which leads to permanent "dead spots" in the illumination. If you need a reliable foundation for your display, consider our professional TFS tension fabric systems for guaranteed results.
Testing Your Graphics Before the Show
You don't need a laboratory to verify your graphic's quality. Perform a "Torch Test" by holding a high-intensity flashlight 10cm behind the fabric. If you can see the distinct shape of the bulb through the material, the fabric is likely too translucent for a slimline lightbox. Woven fabrics generally offer superior stability and opacity compared to knitted alternatives, which can stretch and thin out under tension. Furthermore, UV-printed graphics often provide better diffusion than dye-sublimation. The UV ink sits on the surface of the fibers, creating an additional physical barrier that helps scatter the light more effectively across the display face.
Investing in Professional Infrastructure for Event Success
While on-site reactive measures can salvage a display, the most effective strategy for troubleshooting led lightbox hotspots is to prevent them at the specification stage. High-pressure event environments leave little room for technical failure. Relying on under-specified, imported hardware often leads to the visual inconsistencies that undermine brand authority. Transitioning to professional-grade infrastructure ensures that the 1:1.5 depth-to-pitch ratio is a factory standard rather than a goal you are struggling to reach during assembly. Investing in UK-manufactured systems provides a level of quality control that simply cannot be matched by generic, mass-produced alternatives.
Reliability in illumination comes from the synergy between components. Professional systems utilize pre-tested LED arrays that are perfectly matched to their power supplies. This prevents the voltage drops or thermal issues that cause flickering and premature dimming. When hardware is engineered as a complete system, the light output remains stable across the entire graphic face. This technical precision allows managers to focus on their event objectives rather than logistical repairs. By choosing infrastructure built for resilience, you secure a high-end finish that reflects the true value of your brand.
Quality Assurance in Lightbox Manufacturing
Our manufacturing process prioritizes color accuracy and structural integrity. We use high-CRI (Color Rendering Index) LEDs to ensure that your brand colors are reproduced with total fidelity under artificial hall lighting. For large-scale installations, the stability of the frame is paramount. We often integrate our lightboxes with heavy-duty truss systems to provide the necessary support for expansive, illuminated backdrops. If your project involves unique spatial requirements, bespoke engineering allows us to create custom-depth frames. These tailored solutions ensure that even the slimmest profiles maintain a flawless, hotspot-free glow through precise diode positioning.
The CokerExpo Advantage
We understand the deadline-driven nature of the exhibition industry. Our commitment to regional reliability includes national UK delivery and dedicated support to meet even the most demanding event schedules. Beyond providing hardware, our professional event management services allow experts to handle the complex technical logistics of your stand. This comprehensive approach ensures that every component, from the tension fabric to the power distribution, is optimized for maximum impact. Ready for a flawless display? Explore our professional lightbox range to find the essential infrastructure for your next successful event.
Achieve a Seamless Brand Presentation
Achieving a flawless, uniform glow is a matter of technical precision rather than luck. You've learned that applying the 1:1.5 depth-to-pitch ratio and selecting high-opacity fabrics are the keys to a professional finish. Troubleshooting led lightbox hotspots is much simpler when your hardware is engineered for performance from the start. Transitioning from reactive on-site fixes to a reliable, pre-tested system ensures your brand remains the focal point for all the right reasons.
CokerExpo provides the essential infrastructure for your success. We are specialists in high-impact TFS and dynamic lighting with over 25 years of exhibition experience. Our UK-based manufacturing and expertise mean we handle the technical logistics so you don't have to. You can trust our hardware to deliver a resilient, high-end finish in any high-pressure environment. We project confidence in our ability to handle bespoke requests, ensuring your stand meets every specific requirement.
Ready to ensure your next display makes the right impression? View our range of professional LED Lightboxes. Your brand deserves a presentation that reflects its true value and professional standing.
Frequently Asked Questions
Why can I see the LED dots through my lightbox fabric?
Visible dots, or the "Starry Night" effect, occur when the light cones from individual diodes don't overlap before hitting the graphic face. This is typically caused by a frame that is too shallow or LEDs that are spaced too far apart. If the fabric has low opacity, it won't have the density required to scatter the concentrated light rays effectively.
How far should LEDs be from the graphic to prevent hotspots?
The ideal distance depends on your LED spacing, but back-lit systems generally require a minimum depth of 40mm to 100mm. When troubleshooting led lightbox hotspots on-site, even a small increase in this air gap allows the light to "bloom" more naturally. This extra space helps the individual light cones merge into a single, uniform wash before reaching the viewer.
Can I use a dimmer to fix hotspots in an existing lightbox?
Yes, reducing the light intensity to approximately 80% is a highly effective emergency fix. Lowering the peak brightness softens the harshness of individual diodes, which makes the hotspots much less noticeable to the eye. It's a reliable trade-off during an event when you don't have the option to change the internal hardware or frame depth.
What is the best fabric for an LED lightbox display?
High-opacity polyester fabrics like "Samba" are the professional standard for illuminated displays. These materials usually feature a weight between 180gsm and 250gsm and include specialized coatings designed to maximize light diffusion. They ensure your graphics remain vibrant while completely hiding the internal LED array and power components from view.
Does the colour of my graphic affect how hotspots appear?
The ink density of your design significantly impacts light uniformity. Darker colors and heavy saturation absorb light, which helps mask any inconsistencies in the LED array. Conversely, large areas of white space or light pastels are the most difficult to illuminate because they reveal every minor variation in light intensity behind the fabric.
Is it better to use a back-lit or edge-lit lightbox for large graphics?
Back-lit systems are the superior choice for large-scale displays because they provide a consistent grid of light across the entire surface. Edge-lit systems rely on light traveling from the perimeter, which often leads to "shadowing" or dark spots in the center of frames larger than 2 meters. For total reliability on a big stand, a back-lit array is the safer investment.
How do I fix shadows in the corners of my fabric frame?
Corner shadows usually indicate that the silicone keder isn't seated perfectly in the frame channel. You should always press the graphic into the four corners first before working toward the center of each rail. If shadows remain, check that the internal LED modules extend fully to the edge of the frame and aren't being blocked by support brackets.
What is the "depth-to-pitch" ratio in lightbox design?
The 1:1.5 depth-to-pitch ratio is the mathematical benchmark for achieving uniform illumination. This rule states that for every 10cm of frame depth, the center-to-center distance between LEDs should not exceed 15cm. Adhering to this formula is the most professional way of troubleshooting led lightbox hotspots during the initial specification of your display system.
Einen Kommentar hinterlassen