
The Ultimate Guide to Shell Scheme Graphic Panels for UK Exhibitors
Your exhibition stand has exactly 3 seconds to capture a passing visitor's attention. Yet, 62% of exhibitors waste that critical window by relying on the cold, grey walls of a standard organiser-supplied booth. You've likely felt the pre-show anxiety of wondering if your graphics will actually align with the specific Octanorm or Sodem system used at venues like the NEC or ExCeL. It's a common frustration for the 1.3 million business visitors who attend UK trade shows annually, where standing out is the only way to secure a real return on investment.
You don't need a five-figure budget to dominate the hall. You can eliminate installation stress while achieving a bespoke look using high-quality shell scheme graphic panels that fit perfectly every time. This guide provides the technical clarity you need to turn a basic shell into a professional, high-impact brand environment. We'll examine the differences between rollable PVC and seamless tension fabric, explain how to navigate varying grid dimensions, and share our proven strategies for rapid, tool-free assembly.
Key Takeaways
- Learn how to transform a basic modular stand into a high-impact brand environment using professional shell scheme graphic panels.
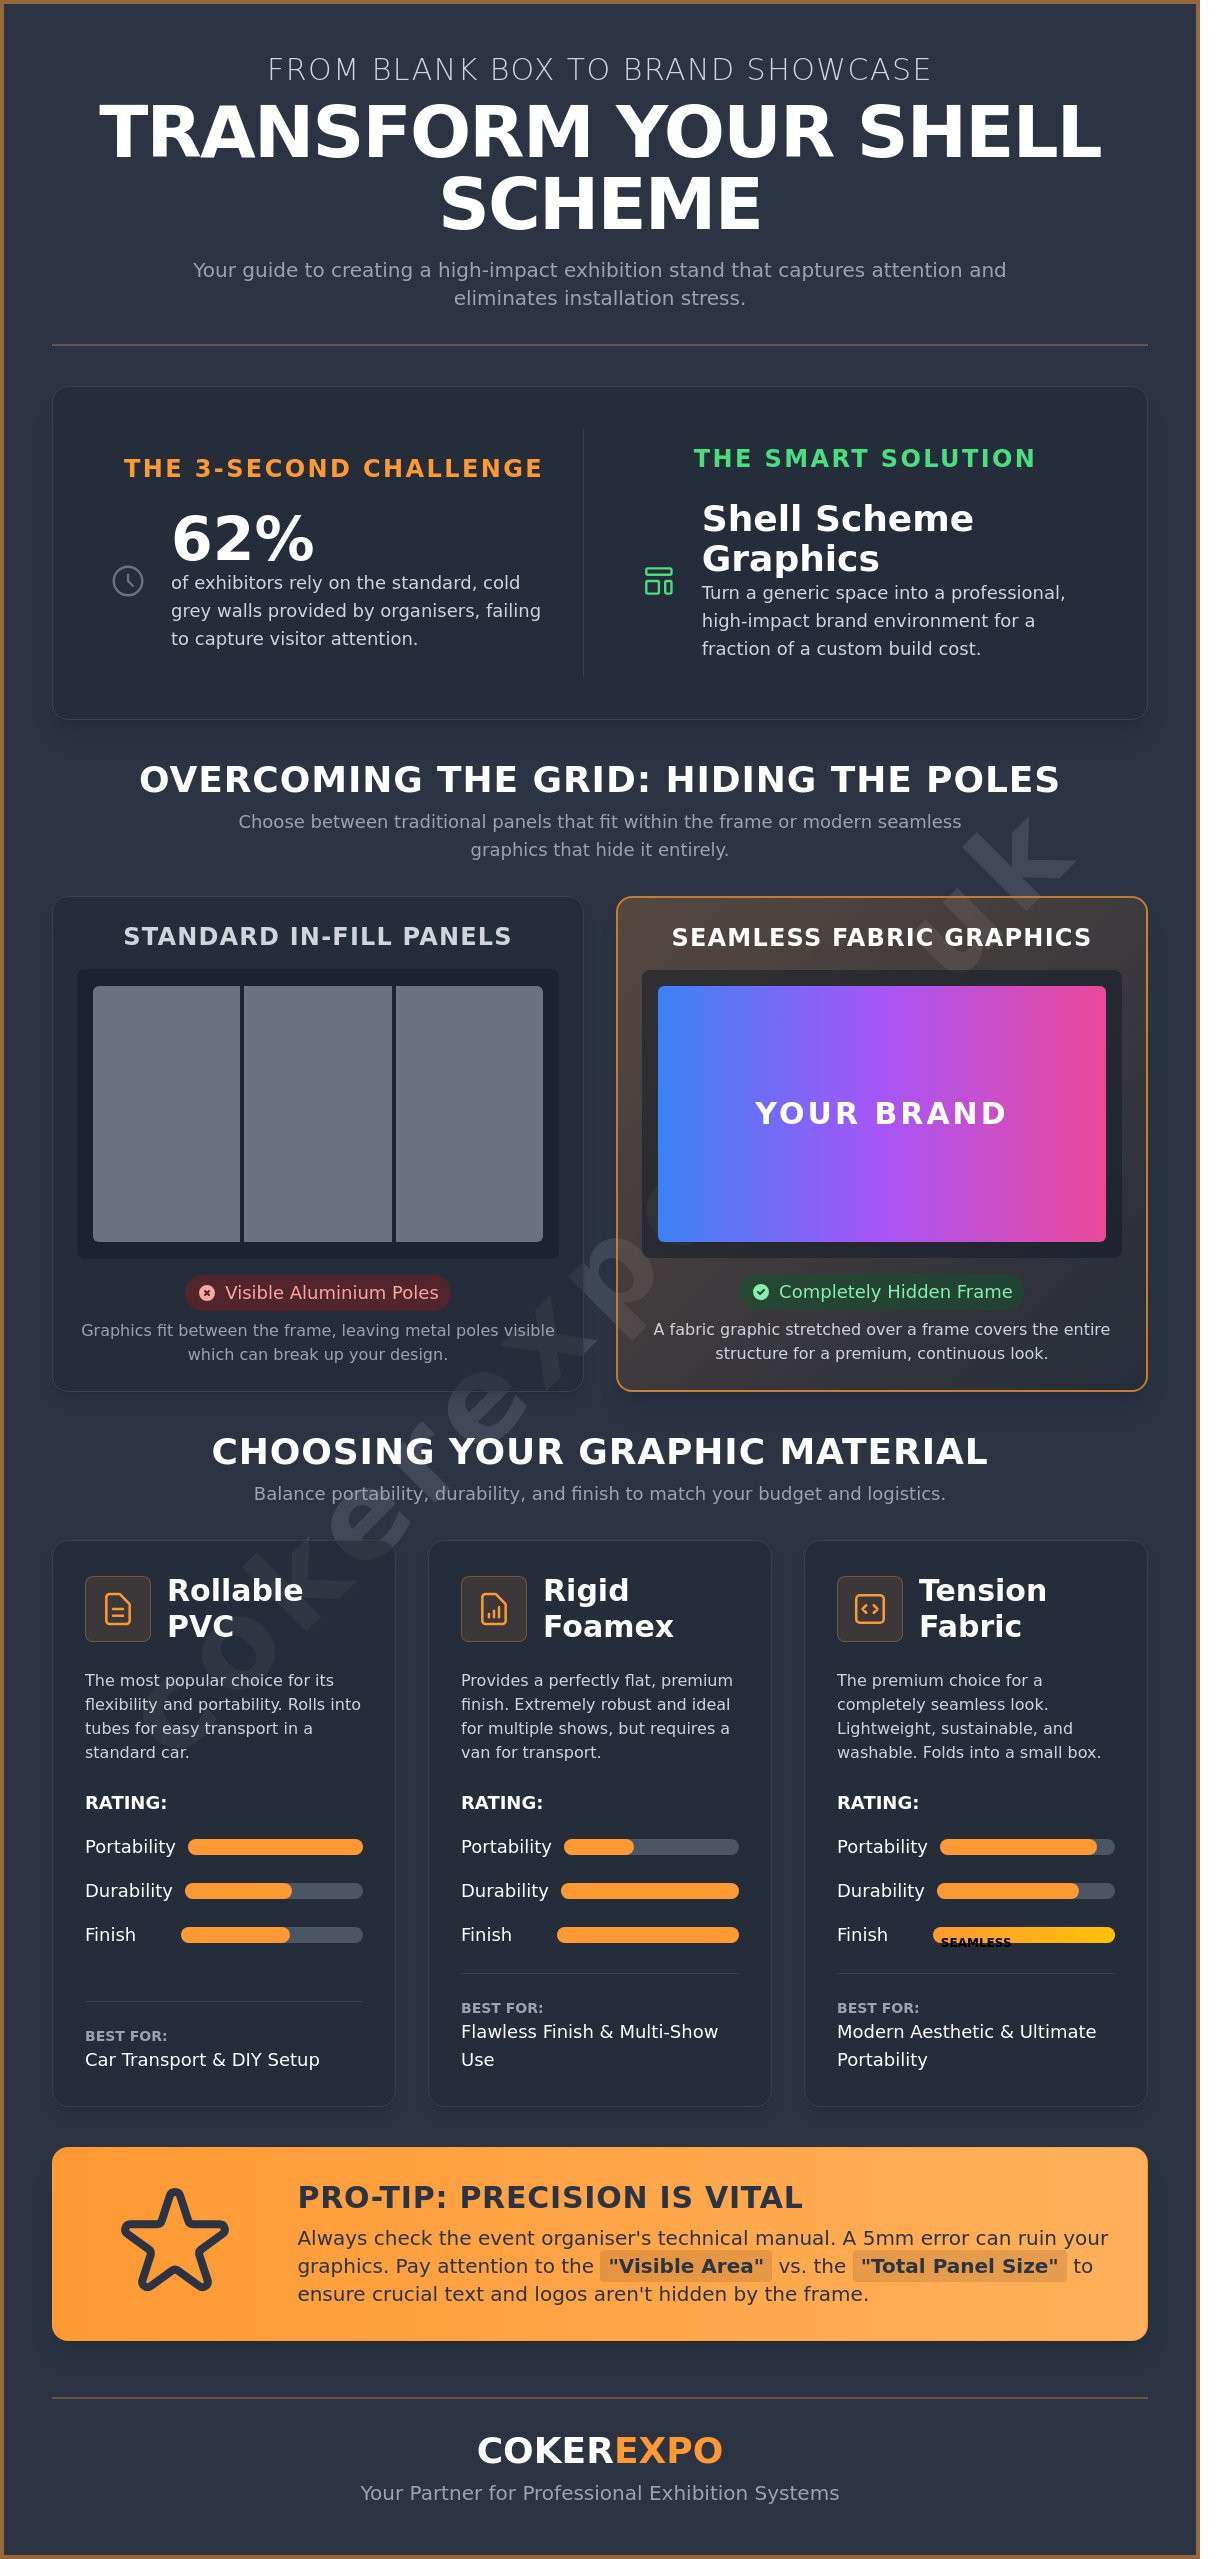
- Evaluate the benefits of rollable, rigid, and fabric materials to choose the most practical option for your transport and storage logistics.
- Discover how to eliminate visible aluminium poles by choosing between traditional in-fill panels and modern seamless graphic solutions.
- Avoid costly printing errors by mastering the exhibition technical manual to ensure your graphics are measured with absolute precision.
- Maximise your presence on the trade show floor by integrating advanced modular systems and illuminated display elements for added depth.
What are Shell Scheme Graphic Panels?
A shell scheme is the standard modular stand provided by exhibition organisers at almost every major UK trade show. It consists of a basic aluminium framework with grey or white infill panels that create a "blank box" for your business. While these structures are functional, they lack any brand identity. High-quality shell scheme graphic panels are the solution to this problem, designed to cover the basic boards and transform a generic space into a professional marketing environment.
The typical UK shell scheme structure relies on a system of vertical aluminium uprights and horizontal crossbeams, usually from manufacturers like Octanorm or Sodem. Your graphics are produced to fit these specific dimensions, mounting directly onto the 4mm or 5mm infill boards. By using custom-printed panels, you avoid the sterile look of the default stand and create a cohesive brand message that attracts footfall from across the hall.
Why Exhibitors Choose Shell Scheme Graphics
Choosing shell scheme graphics is a strategic move for marketing teams focused on ROI. A bespoke space-only build can easily cost upwards of £10,000, whereas a high-impact graphic set for a standard 3m x 3m stand typically costs between £700 and £1,300. These systems prioritising speed and ease of use. Most of our shell scheme graphic panels are designed for tool-free assembly. This means a marketing manager can brand a stand in under 40 minutes without hiring expensive specialist contractors. It's a practical way to achieve a professional finish while keeping logistics simple.
Standard Sizes and the UK Market
Precision is vital when ordering graphics for the UK market. While a common panel dimension is 950mm wide by 2340mm high, specifications vary significantly between venues. For example, a stand at the NEC Birmingham might use a different system than one at the Excel London. You must always distinguish between the "total panel size" and the "visible area." Aluminium uprights usually obscure approximately 20mm of each panel edge. If your design places a logo or crucial text too close to the perimeter, the frame will hide it. We always recommend checking the specific technical manual provided by your event organiser to ensure a perfect fit. Using the wrong dimensions by even 5mm can result in panels that buckle or fail to stay secure during the show.
Comparing Material Options: Rollable, Rigid, and Fabric
Selecting the right material for your shell scheme graphic panels determines both your stand's aesthetic impact and your logistics budget. UK venues like the NEC or ExCeL London strictly enforce fire safety regulations. All materials must meet BS 5867 Part 2 or Class 1 fire ratings to pass inspection. Your decision rests on your transport capacity and how many shows you plan to attend this year.
Rollable PVC Panels: The Flexible Choice
Rollable panels remain the most popular choice for exhibitors prioritising portability. We use 450-micron "stop-light" PVC. This material includes an opaque layer to prevent shadows from the shell scheme's internal structure or backlighting from ruining your graphics. These panels roll into 900mm wide tubes that fit easily into a standard hatchback. You apply them using magnetic tape or hook-and-loop fasteners directly to the frame. They're a budget-friendly entry point, though you must handle them carefully to avoid "edge curl" after repeated use.
Rigid Foamex Panels: The Durable Alternative
Rigid Foamex provides a perfectly flat, premium finish that rollable shell scheme graphic panels cannot match. We recommend 3mm or 5mm Foamex for a solid wall feel that mimics a custom-built stand. Logistics require more planning here. A 2.4m high panel requires a van and protective packaging to avoid corner dings during transit. These boards are incredibly robust. They often last for 12 or more shows when stored correctly. If you're running a long-duration trade show or a semi-permanent installation, the structural integrity of rigid boards is worth the extra transport cost.
Tension Fabric Graphics (TFS): The Premium Finish
Tension Fabric Systems (TFS) provide a completely seamless look by hiding the shell scheme poles entirely. This system uses a Silicone Edge Graphic (SEG) that clips into a lightweight aluminium frame mounted to the stand. Fabric is 60% lighter than traditional PVC, making it the most sustainable and portable high-end option. You can fold a 10-metre graphic into a single box. It's also washable at 30 degrees, ensuring your brand stays sharp across a busy event calendar. For a sleek, modern aesthetic, view our range of tension fabric solutions to see how they transform basic stands.
- Rollable: Best for car transport and DIY setup.
- Rigid: Best for durability and a perfectly flat appearance.
- Fabric: Best for a seamless, premium finish and easy storage.
Seamless Graphics vs. In-fill Panels: Overcoming the Grid
The most frequent complaint among the 1.3 million people who exhibit in the UK annually is the intrusive appearance of the aluminium grid. These vertical uprights break your brand's visual flow every 950mm or 1000mm, depending on the specific system provided by the organiser. You must decide between working within these structural constraints or investing in a system that bypasses them entirely. Choosing the right shell scheme graphic panels depends on your balance of budget and the level of aesthetic impact your brand requires to stand out in a crowded hall.
The In-fill Approach: Practical and Budget-Friendly
In-fill panels remain the standard solution for approximately 65% of UK shell scheme exhibitors. These individual boards sit inside the recesses of the aluminium frame, typically secured by hook-and-loop tape. Because you aren't covering the poles, the hardware remains visible. This creates a segmented look that some find utilitarian, but it offers unmatched flexibility for long-term use.
Success with this method requires careful artwork preparation. You should ensure your designer keeps critical text and logos at least 50mm from the panel edges to prevent them being obscured by the metalwork. This approach is highly efficient for modular updates. If you need to change a single product offer for a specific event at the NEC, you can swap one panel for approximately £70 to £90 without needing to reprint the entire wall. It's a pragmatic, tool-free solution for businesses with high-frequency event calendars and shifting marketing messages.
Achieving the Seamless Look
If you want to eliminate the "modular look" and hide the structure, seamless graphics are the answer. This is achieved using magnetic "over-the-pole" kits or Tension Fabric Systems (TFS). Magnetic shell scheme graphic panels use a wider cut and specific adapters to sit flush against one another directly in front of the uprights. This hides the aluminium entirely and creates a continuous, uninterrupted image across the back wall.
Tension Fabric Systems take this a step further by using a single piece of printed fabric stretched over a lightweight frame. This approach provides the high-end finish of a custom-built stand for roughly 35% of the cost of a traditional timber build. It effectively turns a basic shell into a professional brand environment. These systems are made in the UK and designed for fast turnaround; they allow you to project a premium image without the logistical nightmare of a bespoke construction team. Deciding between these methods requires a clear look at your goals. While the initial outlay for a seamless system might be 25% higher than standard in-fill panels, the professional perception it creates often leads to significantly higher engagement from trade show attendees.
Measuring and Preparing Your Shell Scheme Graphics
Precision is the difference between a professional stand and a costly mistake. The golden rule for every exhibitor is simple: never send artwork to print based on "standard" dimensions found online. Every shell scheme system has unique tolerances. You must download the technical manual from your event organiser's portal, which is typically released 12 to 16 weeks before the show. This document specifies the exact dimensions for the infill panels. Attempting to guess these measurements often results in graphics that are too wide to fit the grooves or too narrow to cover the substrate.
Mastering the Measurements
Most UK venues use Octanorm systems, but you may also encounter Sodem or Maxima frames. Octanorm accounts for approximately 80% of the UK market, yet even these frames vary in thickness. When reading your manual, look for the "infill" size versus the "visible" size. You should allow for a 5mm bleed on all sides of your artwork to ensure no white edges appear after trimming. The visible area is the space not obscured by the frame. If you are designing a continuous image across three panels, you must account for the 30mm or 40mm aluminium uprights that will break the visual flow.
Artwork Specifications for High-Impact Print
Large-format printing is unforgiving of low-quality files. Set your artwork at a resolution of 100 to 150 dpi at 100% physical size. If you work at half-scale, ensure the resolution is doubled to 300 dpi. Always use CMYK colour profiles rather than RGB to maintain brand consistency; this prevents your corporate blues from appearing purple under harsh exhibition hall lights. When designing shell scheme graphic panels that span multiple sections, keep critical text and logos at least 50mm away from the panel edges to avoid them being "cut" by the vertical poles.
Installation Techniques and Tips
Choosing the right hardware depends on your chosen material. For 3mm Foamex panels, the "Hook and Loop" (Velcro) method is the most reliable. Apply 25mm heavy-duty hook tape to the back of the panel and the corresponding loop tape to the shell scheme wall. If you prefer rollable PVC shell scheme graphic panels, magnetic strips provide a sleek, hidden attachment. Regardless of the method, always carry an emergency kit. This should include a 5m steel tape measure, a spirit level, a sharp craft knife, and a 10m roll of spare high-tack adhesive tape to resolve any onsite alignment issues.
To ensure your display fits perfectly first time, order your custom shell scheme graphic panels from our specialist production team.
Maximising Brand Impact with CokerExpo Display Systems
Effective exhibiting requires more than just covering the walls. While high-quality shell scheme graphic panels form the foundation of your space, a flat 2D environment often fails to stop foot traffic in busy halls like the NEC or ExCeL. You can transform a standard 3m x 3m booth into a multi-dimensional brand experience by layering textures and light. Integrating exhibition lightboxes adds immediate visual depth; they draw the eye with 2,000 lumens of backlit brilliance that cuts through the dim ambient lighting of most trade show venues.
Our hardware focuses on a tool-free philosophy. This means you won't waste the first three hours of your build day hunting for an Allen key or a specific screwdriver. Everything we supply is designed for rapid assembly. It's a system that allows you to focus on your sales strategy rather than construction logistics. When you choose CokerExpo, you're choosing a UK-based partner that prioritises reliability and speed. We understand that in the exhibition world, a missed deadline is a missed opportunity.
Adding Depth with Portable Furniture
Think about the floor space as much as the walls. Using folding display boards creates natural partitions for smaller breakout areas or private consultation zones within your shell scheme. Pair these with promotional counters that match your wall graphics to create a cohesive, professional look. For a real-world example of how these elements combine for a premium feel, look at the Harrods Beauty case study. It demonstrates how strategic furniture placement elevates a brand from a mere vendor to an industry leader.
Why UK-Made Quality Matters
Local production is your best insurance policy against tight exhibition deadlines. We handle our printing and finishing in-house, which allows for 48-hour turnaround times on many standard orders. We use premium 450gsm materials that won't curl at the edges or fade under intense 1,000-watt hall lights. As your Practical Specialist partner, we provide more than just kit; we offer the technical support needed to ensure your shell scheme graphic panels fit perfectly every time. Our team understands the specific grid dimensions of UK venues, ensuring your graphics look seamless and professional from the moment the doors open.
Elevate Your Next Exhibition Presence
Choosing the right shell scheme graphic panels turns a standard 9-square-metre booth into a high-impact brand environment. Your selection between rollable PVC, rigid Foamex, or seamless tension fabric determines both your visual footprint and your logistical efficiency. Precision is the priority; accurate measurements ensure your graphics align perfectly across every aluminium upright. At Coker Expo, we've spent over 25 years refining exhibition hardware to eliminate common onsite headaches. We're tool-free assembly specialists, providing systems that your team can install in under 45 minutes without hiring specialist contractors.
Every panel we produce is manufactured in our UK facility, ensuring rigorous quality control and reliable lead times for your event schedule. By focusing on robust materials and intuitive modular designs, we help you create a professional finish that stands out in a crowded hall. You aren't just buying a display; you're investing in the infrastructure of your business growth. We look forward to helping you make a lasting impression at your next trade show.
Explore our range of Shell Scheme Graphic Panels and transform your stand
Frequently Asked Questions
What is the standard size of a shell scheme graphic panel?
Standard shell scheme graphic panels typically measure 950mm wide by 2340mm high. However, dimensions vary between systems like Octanorm and Sodem used at major venues like the NEC or ExCeL London. You must check your exhibitor manual for the exact visible area specifications. We recommend measuring the internal width between the aluminium uprights to ensure a flush fit within the 15mm to 20mm recesses.
How do I attach graphic panels to a shell scheme wall?
You attach panels using heavy-duty hook and loop tape or magnetic strips. Apply the hook side to the back of your shell scheme graphic panels and the loop side directly to the aluminium frame provided by the organiser. This method supports panels weighing up to 2kg per square metre without falling. It allows for a clean finish that stays secure for the duration of a three-day trade show.
Can I reuse my shell scheme panels at different exhibitions?
You can reuse your panels across multiple events if you choose the right materials. Rollable PVC panels are designed for longevity and can be rolled into 300mm diameter tubes for safe transport. Rigid 3mm Foamex panels are also reusable but require flat-pack transit to avoid corner damage. Ensure you replace the adhesive Velcro every 3 to 4 shows to maintain a strong bond with the shell scheme walls.
What is the difference between rollable and rigid shell scheme panels?
Rollable panels are made from 450-micron polyester or PVC, making them highly portable for one-person setups. Rigid panels are typically 3mm Foamex boards which offer a perfectly flat, premium finish but require a van for transport. While rollable options are easier to ship via standard UK couriers for approximately £20, rigid boards provide better durability for long-term use in high-traffic environments.
How do I make my shell scheme graphics look seamless?
To achieve a seamless look, use a shell-clad clip system or tension fabric graphics that sit in front of the aluminium uprights. Standard shell scheme graphic panels usually leave the metal poles visible between each 1-metre section. By using clips that offset the panels by 25mm, you create a continuous wall of branding. This covers the structural grid and transforms a basic 3m by 3m booth into a bespoke-looking stand.
Do I need tools to install shell scheme graphic panels?
No tools are required for the installation of most shell scheme graphics. Our systems rely on a tool-free assembly process using adhesive-backed tapes or clip-on brackets. This saves you the £50 to £100 hourly rate often charged by on-site contractors. You can complete a standard three-wall U-shape booth in under 45 minutes using just a step ladder and a pair of scissors to trim the tape.
What is a stop-light backing on an exhibition panel?
Stop-light backing is an opaque grey or black layer applied to the reverse of a graphic to prevent light from shining through. Without this 100% block-out layer, shadows from the shell scheme structure or booth lighting will distort your artwork. This is essential in bright halls like Olympia London where high-intensity overhead LEDs can wash out your brand colours if the material isn't light-fast.
How long does it take to print shell scheme graphics in the UK?
Standard production time for shell scheme graphics in the UK is 3 to 5 working days from artwork approval. We often accommodate 24-hour express turnarounds for urgent requirements, provided the print-ready PDF is received before 10:00 AM. Since we manufacture in-house at our UK facility, we control the entire process. This ensures your hardware and graphics arrive together via a tracked 24-hour courier service.
Laisser un commentaire